UNIVERSAL LASER SYSTEMS VLS SERIES STANDARD SERVICE
The following information is provided for educational reference ONLY. All repairs should be undertaken by a qualified engineer. The use of the following information is done so entirely at your own risk! Kent Lasers is an INDEPENDENT service provider and not affiliated with any machine brand or manufacturer.

The mechanical set up of most Universal Laser Systems machines we have serviced are prone to the same common faults and perishable items which seem to be independent of what materials are being cut, age of machinery and whether the client is undertaking primarily cutting or engraving.
Mechanically the VLS and PLS range is virtually identical, with the main issues being dirt ingress on bearing "guide" wheels/running surfaces and premature belt wear/stretch; these items can fortunately be easily serviced. From our experience on working on these machines we have tailored a service package which aims to avoid machine down-time due to component failure and excessive wear on perishable "consumable" items. Service schedules however must be undertaken!
The first point of inspection will be to visually gauge the condition of the belts on both the X and Y axis. Belts should be checked for tension (both Y belts and the X belt should have similar feel of tension), de-lamination of tension chords, and excessive wear of mating surfaces.
The opposite image demonstrates a common problem on these machines, with tension chords within the driving belt beginning to perish.
The next point of inspection should be the ribbon cable to the right-hand-side of the gantry. This is not a common failure mode, however we have seen these items damaged due to inadequate cleaning of the machines interior; often caused by poor extraction, or lack of basic maintenance.
The surfaces should be inspected for cracks, scuffs wear of the insulating (outer) material and kinks.
On machines fitted with collimators (used with HPDFO lens set ups) or enhanced optical protection the air diffusers must be checked for overall condition and operation. This can be achieved by running the air assist compressor and ensuring positive pressure is present within the optical enclosure(s)
If these items are heavily soiled, or discoloured, they should be replaced. It is good practise to ensure an air-line filtering system is fitted to the machines air-assist supply and filter housings are drained of condensate regularly. This will prolong the life of both the diffuser material and optical elements.


As Universal have chosen not to fit a linear guide system with sealed bearings (often linear guides used in automation systems have "wipers" which ensure no dirt or debris is allowed to enter the gliding bearing surfaces, and dust/particles are brushed away) extra care must be taken to keep the bearing wheels and guide track clean.
This can be achieved by wiping the wheels and track with a disposable towel, or microfiber cloth. The image opposite demonstrates build up of dirt after 6 months of light use.
Care should also be taken here to ensure no dust, or debris from the cutting process is allowed to enter in the belt rebate, as this can drag contamination into the pulleys and belt teeth.
Cleaning the outer most areas (between the aluminium guides and outer side of the casing) is also recommended, as this area is prone to accumulating dust, and contamination from the cutting process.
Furthermore, the track, which is located on the back-side of the X axis gantry is a prime location for debris and waste materials from the cutting process to become trapped. This assembly houses the air assist lines which are routed to the focus carriage (cutting head) and nozzle.
We usually dismantle this assembly to ensure it is clean and 100% free of debris. Often we find that clients who are regularly cutting paper, or very thin (and light) sheet materials will often have issues with these parts, as the jet of air from the air assist nozzle blows smaller cut items around during the cutting process.
Finally before re-assembly of these items, it is recommended to wipe the internal air-lines down with a silicon lubricant to ensure wear of the internal surfaces is kept to a minimum.


Another area worthy of inspection is the spring-tensioner on the underside wheel of the focus carriage. This item has a tendency to become stuck, and therefore the correct amount of tension is not applied to the bearing wheels.
This can often be noticed with a reduction in raster engraving quality, or uneven-ness in scribed lines (wobble). To resolve this issue, the retaining bolt can be loosened slightly and a small amount of penetrating lubricant applied to the underside of the fixing post (circled in red in the opposite image)
This area is also prone to contamination due to its proximity to the cutting process. Any cutting residue, such as tar or dust from engraving should be removed. In extreme cases this assembly may require further dis-assembly and cleaning with detergent or a light solvent, such as IPA.
Please note that the front plate which holds the 3rd reflection mirror and focusing lens was removed before undertaking removal of the focus carriage or servicing of the bearing pre-load.
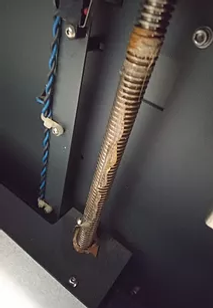
Moving further down the machine, the Z-axis lead screws can be found. It is recommended to re-grease the entire length of these screws (3 screws are fitted to VLS and PLS models) to ensure reliable operation.
In extreme cases, where equipment is heavily contaminated, the old grease may have to be removed using a solvent solution.
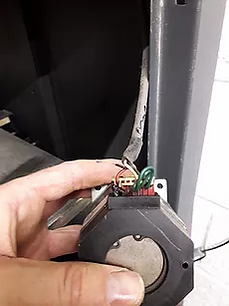
We have seen, especially on older models fitted with Pacific Scientific motors, the motors connectors burning-out due to leadscrews becoming packed with dried grease and dirt.
This can lead to motor replacements being required, or in the worst cases, motor driver circuitry requiring replacement which entails a high cost of repair.


The last items of service are to ensure all running surfaces are clean and free of contamination. All wheels should now have been cleaned, and the indentation area on the gantry and y axis rails (as shown in red) free of dirt and debris.
Please note the bolt circled in green. These can be found at the front of the machine on both left-hand-side and right-hand-side and are used to ensure the gantry is aligned correctly to the Y axis rails. The same amount of clearance should be observed between the gantry and bolts at BOTH sides of the machine.
It is essential to check these points before checking optical alignment, or attempting any re-alignment procedures.
Finally to ensure the health of the laser source (tube) a full power test should be performed. It is imperative to measure and log power output at each service as this gives an excellent indication of tube deterioration over time, and can help avoid down-time due to loss of power.
Understanding tube output during the ownership of your equipment will help plan (and budget) for re-fills which will inevitably be required at some point of ownership.
Before a power test is performed, all optics (beam windows, collimators and mirrors) are checked for condition and damage. These items are replaced as necessary.
Kent Lasers are also happy to investigate any issues you may feel are present on equipment, and will endeavour to resolve faults at time of servicing.

Please Contact Us to discuss any aspect of machine Service and Repair, or to find out about our range of Innovative Laser Cutting Systems click below:

